Slick is a nifty jquery plugin that makes spiffy (yes I said spiffy) sliders, combined with Advanced Custom Fields Pro gallery field you can make an easy to use client interface to allow them to add images to a slider on a post/page or custom post type.
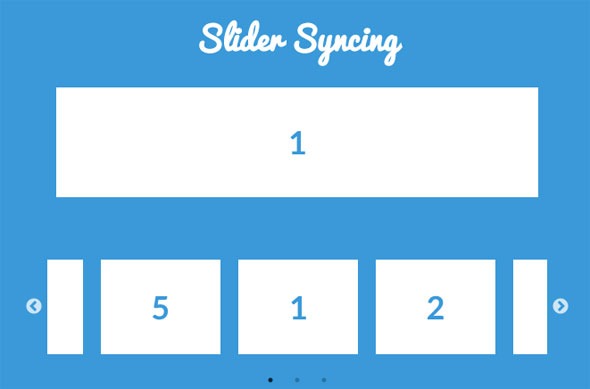
The example slider in this tutorial will use the Slider Syncing Layout. – I have another tutorial that covers the Multiple Layout.
Getting Slick in order
Download the latest Slick version.
Move into your CSS directory – slick.css, slick-theme.css, fonts, ajax-loader.gif
Move into your JS directory – slick.min.js
Create a slick-init.js file and also file in JS directory and add in…
Enqueue the Styles and Scripts in WordPress
In your functions.php file add in…
Creating the Gallery Field in ACF
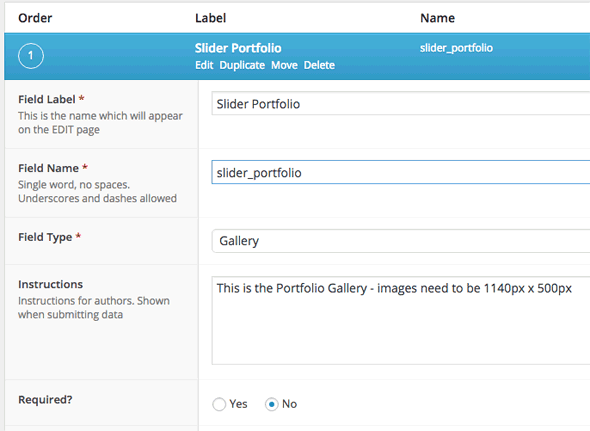
In ACF Pro’s custom fields, create a field label and name and set the type to Gallery as a minimum, there are some other fields you can set.

Then set the location where the fields should show up, above I am setting it to a custom post type.
Adding the Images
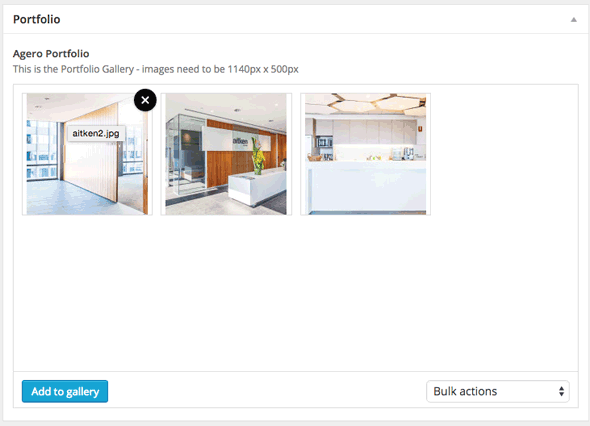
Now in your custom post type, post or page add in your images.
Output the Slider Code
ACF has the code on the website to output the gallery images in a couple of formats and Slick has the HTML mark up and jquery code you need to output, you just need to merge them together.
So for any WordPress theme add to your template…
or to hook into a Genesis theme by adding in functions.php
Doing it with a Repeater Field (just for kicks)
You could also do the same thing using the ACF repeater field, set up a field make it a repeater and set the sub-field to an image and you the code to below to output it.
That’s it – to change the slider behaviour there are many layout and setting options that you can alter in the slick-init.js file – documentation on the Slick site.
Example below.


9 comments
Roger Penarroya Zaldivar
Hi all,
This line is crashing my JS: _.$slides.add(_.$slideTrack.find(‘.slick-cloned’)).attr({
The slider works but because this error, the other scripts are not running.
Any ideas?
Cheers!!!
video whiteboard animation
Nice blog post thanks for sharing
Jamie
Came across this while trying to do a slider for a client and it worked perfectly as far as coding goes. The one weird thing is as its loading, it sort of piles everything up then snaps into place.
http://xeroproject.com/TEAC/ax-501/
Any ideas on how to get it to load a bit cleaner would be awesome.
Neil Gowran
There are some workarounds here – https://github.com/kenwheeler/slick/issues/1741
Jamie
Awesome thank you very much!
yvonne
I’m hoping you can help troubleshoot an issue I’m having after following this tutorial. I am using the Genesis Child theme on a local install.
I created a CPT named “quotes” as I am trying to create a text-only slider, no images. I also created custom fields using ACF and populated them in the “quotes” CPT. So now I have a bunch of CPTs populated with text-only custom fields.
After following the rest of the tutorial, when I search for those CPTs, the posts and custom fields all show up no problem using the native search. However, I do get an error printed to the page: “:Inavlid argument supplied foreach() in on line “. That’s it, no line # given. Also, the source code shows the slider is being created but instead of my custom fields showing, it’s displaying the error in their place, specifically within the “slick-list” div but outside of the div containing the slides.
But, even though the CPTs are displaying when searched, the slider does not display on my home page, where I am trying to have it show up. Instead it’s being generated in the CPTs. I have put the “foreach()” function into the functions.php file and hooked it into “genesis_entry_content”. I have also tried hooking it in several other places on the page with no luck. The home page source code shows no sign of the slider and I don’t get any errors printed to the page nor in the console.
Can anyone help troubleshoot this issue? I’ve obviously missed some step but I just can’t see it.
This is the code in my functions.php: (it’s currently set to show on all pages, not just home page)
// Set up function for quotes slider on home page

function lol_quotes_slider() {
//this tests for static text and displays fine where the slider is supposed to show
echo 'this isnt working at all';
// this is testing the fields to see if they print out properly
if (get_field('quote')) {
echo '' . get_field('quote') . '';
echo '' . get_field('attribution') . '';
}
$quotes = get_field('quote');
if( $quotes ): ?>
<?php endif;
}
// Display the quotes slider on home page
add_action('genesis_entry_content', 'lol_quotes_slider' );
nturner
I am trying to set up an image slider on a custom post type template that would scroll through custom fields “single-page-project-images”.
asim khan
nice
John
Hi there can anyone help…
Hope you don’t mind this comment, spotted your tut when I was looking for a solution to the way my developer implemented acf and slick and why it was not working so well.
Have taken out the background images and implemented them in the content and still get the same slow load result. Lazy load has no effect.
basically the slides all load one on top of the other at first before the slick.js kicks in an all falls into place. I think this must be some sort of conflict as even if I remove the call to the images the blank slides still load one on top of the other.
I’ve also gone through the plugins and turned them off with no change.
The images are loaded as inline background image and then CSS and media queries control the style.
This is a dev site:
If you or any of your readers have any ideas why it’s happening it would be much appreciated
Thanks
John