 This is a tutorial to change your WordPress site to serve all content via HTTPS/SSL and it is something that is becoming easier and more affordable but also necessary for site owners.
Swapping your site to the secure HTTPS/SSL protocol across the whole website also brings with it a more reputable trust with searchers and a potential SEO boost in traffic.
Any site owners with online transactions have already gone down this route but perhaps only made their e-commerce pages secure, I believe if you have a few pages HTTPS, might as well make the whole site HTTPS.
What you need Hosting wise
Hosting Requirements – IP Address or SNI
If your server supports SNI you do not need a unique IP address, SNI allows for shared hosting clients to also have an SSL Cert, ask your host do they support SNI.
If your host cannot support SNI then you can normally order an IP address as an addition to the monthly hosting fee, normally between $1 – $3 per month.
Generate a Self Signed Certificate and Signing Request
Before you order an SSL Cert you need to generate the SSL Cert and signing request on your server, if you have a cPanel/Plesk style host then these options should be available to you in the GUI, keep a copy of what is generated as you’ll need to add the signing request to where you are buying the trusted SSL Cert from.
The SSL Cert you generate is referred to as a self-signed Cert, it effectively does the job of securing and encrypting all data served from your website but is not cross-checked by a trusted source – so you get a broken padlock icon indicating this.
If you are not using a control panel you’ll need to generate the SSL Cert with a command line tool like openssl.
Get a trusted SSL Certificate
 You can buy a SSL Cert for as little as $10 per year at places like namecheap. These Certs are known as standard validation and are fine and do the job, they are limited to a single domain like sample.com, so won’t cover any subdomain requirements like example.sample.com, you would need multiple ones to cover those. These Certs can be issued very quickly after a few email verifications once issued and installed you’ll get the padlock icon in the browser when your site is visited.
 If you have larger requirements including multiple subdomains or simply want your company name alongside the padlock there are more extensive and expensive SSL Certs with extended validation that you can buy, these take longer to authorize as they require more verification and validation of the company. The costs for these can go up to close to $1300 per annum.
I have come across smaller setups that only require a cheaper SSL cert but have purchased one way above their needs through shoddy salesmanship or bad advice. Shop around, ask questions on what you need.
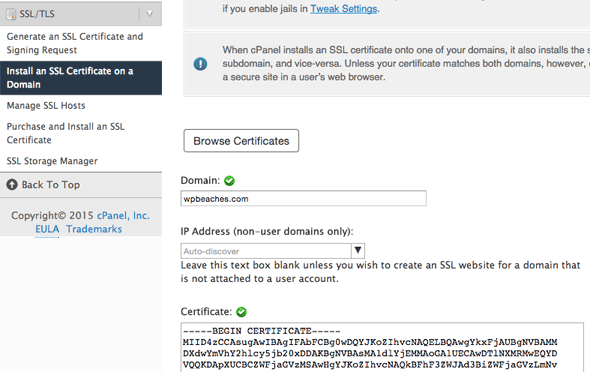
Once you have purchased and received the SSL Cert you’ll need to install it on your host, again most control panel based hosts will have a GUI facility to allow you to do this, you will receive a trusted signed SSL Cert which you need to replace your initial self-signed Cert.
Unfortunately, a lot of the times when going through the process of setting up the SSL Cert there are a few bumps on the journey, just stick with it and talk to your hosting provider and SSL Cert seller on any issues that arise.
You will also likely have a host that just can do the whole thing for you.
Lets Encrypt SSL
Lets Encrypt is a free SSL cert solution, most decent hosting companies are offering it as a one-click solution with automatic SSL Certificate renewals.
Setting Up WordPress for SSL
Once your SSL Cert is up and running time to make your WordPress site run on it.
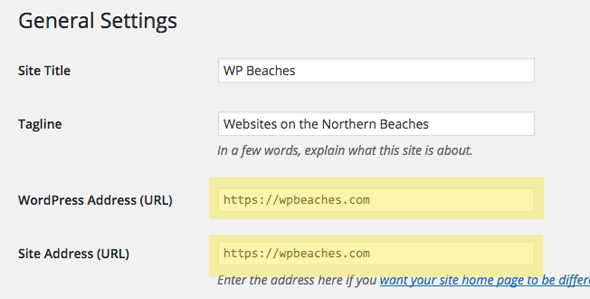
In Settings > General make your WordPress and Site Address have the https:// prefix.
Redirect All Pages from HTTP to HTTPS in .htaccess
In your .htaccess file ensure all pages are redirected from http to the https protocol by adding the following snippet to the top of the file
<IfModule mod_rewrite.c>
RewriteEngine On
RewriteCond %{HTTPS} off
RewriteRule (.*) https://%{HTTP_HOST}%{REQUEST_URI} [R=301,L]
</IfModule>
Or this snippet which WP Rocket recommends
<IfModule mod_rewrite.c>
# Redirect HTTP to HTTPS
RewriteEngine On
RewriteCond %{HTTPS} !on
RewriteCond %{SERVER_PORT} !^443$
RewriteCond %{HTTP:X-Forwarded-Proto} !https
RewriteRule ^(.*)$ https://%{HTTP_HOST}/$1 [R=301,L]
</IfModule>
Dealing with NGINX
*If you are on nginx then .htaccess is non-existent, you can format your server blocks like so
server {
       listen         80;
       server_name    my.domain.com;
       return         301 https://$server_name$request_uri;
}

server {
       listen         443 ssl;
       server_name    my.domain.com;

       [....]
}
Fixing the Broken Padlock on Pages
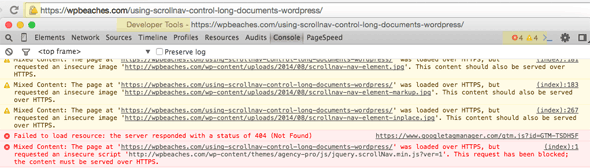
Some of your pages will not be served 100% over HTTPS due to an image or script being called directly over HTTP, you can identify these sources using the Chrome Dev Tools > Console Tab and then take steps to rectify the issue.
Running a Search and Replace for http -> https in the database
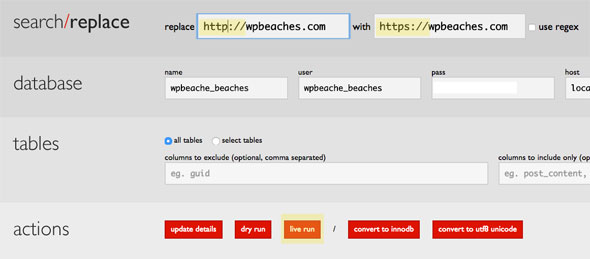
Use a tool like InterconnectIT’s search and replace script to bulk change any absolute URLs in your database, this will quickly solve a lot of mixed content issues and give you less secure error warnings
Google Analytics and WebMaster Tools & Social Media Share Counts
Make sure in your Google accounts you have the https:// variation of your site set up as all data captured will now be stored on the new URL.
For Social Media share counts, unfortunately, you’ll lose some of these, in particular, Twitter and Pinterest some of the others will redirect to the new URL but this is not guaranteed and the time it takes can vary. Social counts going forward will accumulate.
Using a CDN with SSL
You can also use a CDN service with your new HTTPS set up, for example Cloudflare offer an excellent CDN service which as of late has the addition of serving pages via https and also uses SPDY for faster page load times. Once your SSL Cert is set up and your pages in WordPress are set to appear via HTTPS and you have a CloudFlare account just make one change in the Crypto tab.
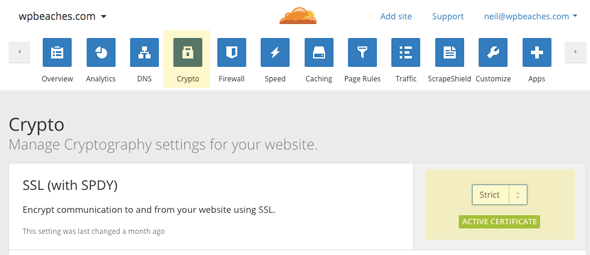
Make the option set to strict to fully utilise the SSL Cert.
SEO Benefit
Google has announced last year that the use of HTTPS will act as a ranking signal in the SERPs albeit a minor one, a lot of SEO folk have also downplayed its importance, my own experience with this is that the use of https has been very positive with some great results in search, this plus being viewed with safe content and a lower cost of entry should have many more sites sporting padlock icons in the next 12 months.