How to create extra widget areas in WordPress – this tutorial uses the TwentyTwelve theme but this can be used on any WordPress theme.
WordPress themes come with a certain number of widgets per theme to position content on the page, for example the TwentyTwelve theme has a sidebar and 2 home page widget areas, you can make many more areas of the layout widgetized by creating extra widget functions and placing the PHP code for those functions in the theme templates which will call the widget content to be rendered on the page.
This guide uses the TwentyTwelve theme and will assume a Child Theme has been set up and activated.
Creating the new widget function
Open up the TwentyTwelve functions.php file and go to line 236 – here you will see some PHP mark up which is registering widget areas.
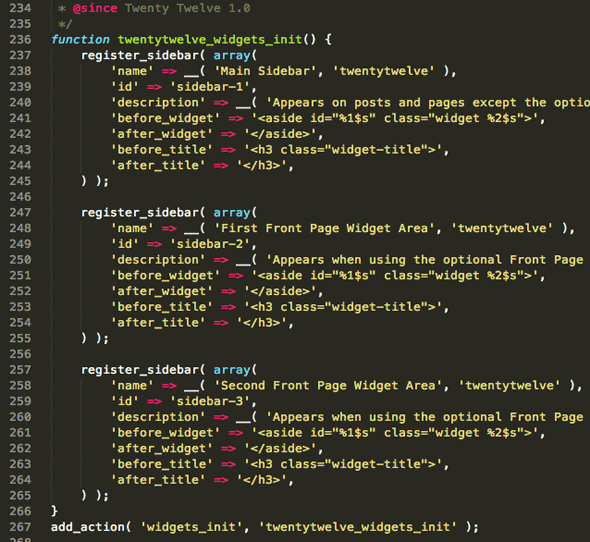
TwentyTwelve has 3 x widget areas.
So here the 3 default widget areas in the parent TwentyTwelve theme are defined within the function named twentytwelve_widgets_init().
Copy this chunk o’ code including the add_action line as illustrated above on line 267 , truncate the code to how many additional widgets you need, this tutotial uses 1.
This is what is then pasted into the Child Theme functions.php file, if the child theme functions.php doesn’t exist just create one and ensure it starts with an opening php tag in the content as below <?php:
Next up is to edit the code so it is unique – the function name, widget name and widget id need to be changed and the action at the bottom needs to have the same new function name.
So the areas highlighted are the ones that need to change so the widget doesn’t clash with any other.
Viewing the widget in the WordPress Dashboard

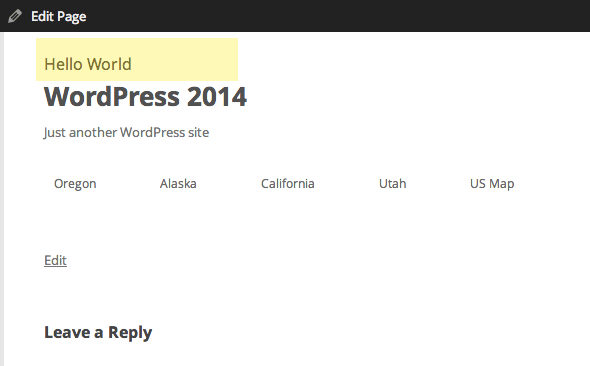
Now you can see the new widget in the backend end with all the other widgets waiting to be populated – to get a fix on the widget position and to see if its working properly add in some dummy text.
Adding the widget code in the backend
So now we need to add in the new php function that has been created in the php templates in the backend, since I want this in the header I need to edit the header.php file, if you want it elsewhere you just need to add it in the appropriate template. This code already exists for the other widgets, you can copy it out of the parents themes sidebar.php file line 13-17:
Change it with the new ID settings and remove some surplus HTML resulting in this:
Here I have added the code to my header.php file which was copied from the parent theme and placed just under the <header> tag
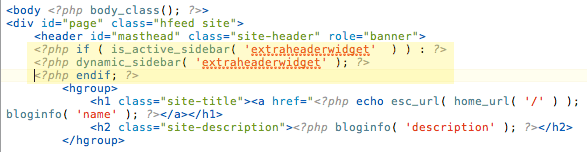
And seeing the content in the header of the document in the browser.
Styling the content
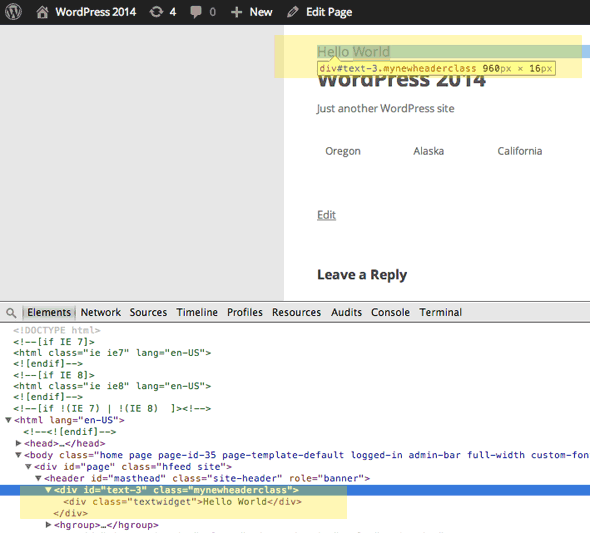
So you can use the widget classes to style the content, the <aside> element has a unique ID and there is also the textwidget class.
These are not really semantically correct so you can change the html mark up in the new function made earlier and add in a class to target.
So here I have just changed the containing elements to be regular old <div> and upped my <h3> tags to <h2>, as a minimum use at least one set of enclosing HTML tags such as a <div></div> otherwise is no HTML mark up is used (which is also ok) the widget is defaulted to a list <li></li> mark up.
The h2 tags will only be used if you fill in the Title field of the Widget in the dashboard.
So now there are a number of unique classes and IDs to target and style the content.
So now you have CSS targets so to float the new content right you can add in a CSS rule to your stylesheet
.mynewheaderclass {float:right;}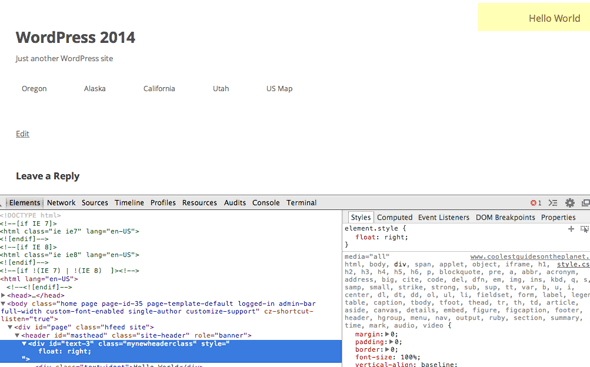
There you have it – you can widgetise until you are blue in the face – one of the main benefits of this approach is that you can get non-technical users to update the content from the front end of WordPress dashboard without worrying about the code.


2 comments
Sarah
Thanks for the tutorial, was helpfull for me!
Yvette
Hi there,
Thanks for this helpful post. I played around with it but got the white screen of death initially. Removed the and from the header snippet and removed the ; from in the second functions snipped. No more errors, but it messed up my header image. Turned the into a and it listened. Yay!