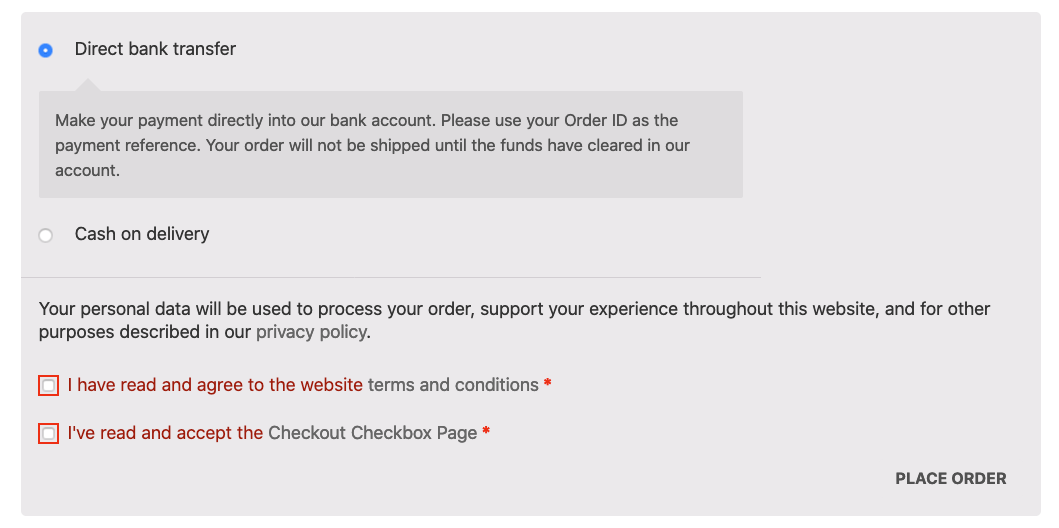
Here is how you can add a required checkbox field in the WooCommerce checkout page that forces a user to checkbox the request before they can proceed to payment, similar to the terms and condition checkbox.
WooCommerce Form Field
Add the code in your functions.php – the example uses the a new checkbox field named ‘checkout_checkbox
add_action( 'woocommerce_review_order_before_submit', 'bt_add_checkout_checkbox', 10 );
/**
 * Add WooCommerce additional Checkbox checkout field
 */
function bt_add_checkout_checkbox() {

    woocommerce_form_field( 'checkout_checkbox', array( // CSS ID
       'type'          => 'checkbox',
       'class'         => array('form-row mycheckbox'), // CSS Class
       'label_class'   => array('woocommerce-form__label woocommerce-form__label-for-checkbox checkbox'),
       'input_class'   => array('woocommerce-form__input woocommerce-form__input-checkbox input-checkbox'),
       'required'      => true, // Mandatory or Optional
       'label'         => 'Ok I agree with <a href="/checkout-checkbox" target="_blank" rel="noopener">Checkout Checkbox Page</a>', // Label and Link
    ));
}

add_action( 'woocommerce_checkout_process', 'bt_add_checkout_checkbox_warning' );
/**
 * Alert if checkbox not checked
 */
function bt_add_checkout_checkbox_warning() {
    if ( ! (int) isset( $_POST['checkout_checkbox'] ) ) {
        wc_add_notice( __( 'Please acknowledge the Checkbox' ), 'error' );
    }
}
If you don’t want a warning and leave the checkbox as optional leave out the 2nd code block and change the required value in the 1st code block to false.
So change the CSS ID (checkout-checkbox) to what you want, optional to add a secondary CSS Class and change your text Label and Link
CSS
.woocommerce-invalid #checkout-checkbox {
    outline: 2px solid red;
    outline-offset: 2px;
}
Add a bit of CSS to get the failed validation style of red box around the checkbox, use the same CSS ID.
So far the checkbox just displays on screen – see the 3 steps below to save that value to the database and display it on the backend and display it in emails.
Add Custom Field to Database as Order Meta
To add this field and value to the WordPress database
add_action( 'woocommerce_checkout_update_order_meta', 'bt_checkout_field_order_meta_db' );
/**
 * Add custom field as order meta with field value to database
 */
function bt_checkout_field_order_meta_db( $order_id ) {
    if ( ! empty( $_POST['checkout_checkbox'] ) ) {
        update_post_meta( $order_id, 'checkout_checkbox', sanitize_text_field( $_POST['checkout_checkbox'] ) );
    }
}
Retreive and display Custom Field to back end in WooCommerce Order Screen
To display the field and label in the backend WooCommerce order.
add_action( 'woocommerce_admin_order_data_after_billing_address', 'bt_checkout_field_display_admin_order_meta', 10, 1 );
/**
 * Display field value on the backend WooCOmmerce order
 */
function bt_checkout_field_display_admin_order_meta($order){
    echo '<p><strong>'.__('Checkout Checkbox Label').':</strong> ' . get_post_meta( $order->get_id(), 'checkout_checkbox', true ) . '<p>';
}
Add Custom Field to WooCommerce Emails
To display the field in emails:
add_filter('woocommerce_email_order_meta_keys', 'bt_custom_order_meta_email');

function bt_custom_order_meta_email( $keys ) {
     $keys[] = 'checkout_checkbox'; // This will look for a custom field called 'checkout_checkbox' and add it to WooCommerce emails
     return $keys;
}
The above code will drop the checkbox in as is, you may though want to use some arbitrary label and text instead, in which case you can use the woocommerce_email_order_meta_fields filter.
add_filter( 'woocommerce_email_order_meta_fields', 'bt_woocommerce_email_order_meta_fields', 10, 3 );
/**
 * Add a custom field (in an order) to the emails with text and label
 */

function bt_woocommerce_email_order_meta_fields( $fields, $sent_to_admin, $order ) {

    $checkbox = get_post_meta( $order->get_id(), 'checkout_checkbox', true );

    if( $checkbox == 1 ) {
        $fields['checkout_checkbox'] = array(
            'label' => __( 'Member' ),
            'value' => __( 'Welcome Aboard' ),
        );
        return $fields;
    }
    else {
        $fields['checkout_checkbox'] = array(
            'label' => __( 'Member' ),
            'value' => __( 'See You Later' ),
        );
        return $fields;
    }
}
So we are assigning our custom field to a variable $checkbox and if that variable is checked (value of 1) it will output Member: Welcome Aboard if it is not checked it will output Member: See You Later


43 comments
Antar
Excellent tutorial. The only thing that escapes me, is how to sort/order these notices? For example,
wc_add_notice( __( ‘Please acknowledge the Checkbox’ ), ‘error’ );
If there is more than 1 notice being displayed, this notice will appear at the top of the others. How do I get this notice to appear at the bottom of the list?
Nikos
Hello guys, I also added a checkbox following this tutorial, and it works well. Thanks to the author. Unfortunately, the validation is bypassed when the shop only offers Paypal as the payment method, or when the user selects Paypal as the payment method. The recommended Paypal plugin from Woocommerce replaces the Woocommerce order button, thus bypassing the validation. Interestingly, the validation still works with the terms and conditions (AGBs). Does anyone have a solution? Can we maybe disable the Paypal button (iframe) using JS? I couldn’t figure it out myself, unfortunately.
Kovy
Works great for me! How can I make the checkbox automatically checked by default?
Fletcher
Thanks for the code! Unfortunately, I am a complete neophyte and can’t seem to make this work.
I’ve put it in the proper area, or at least I *think* I have. I have all the add_action calls in the constructor for functions.php, and the functions themselves directly after the constructor. I’m not seeing any change whatsoever when I test – the checkbox doesn’t show up. I’m sure it’s something simple I’m missing, but I’ve no clue what it might be.
Jordan
How could i mark the string of the checkboxes to be translatable with loco translate i’ve tried to add after the label the Domain path as it is described in locotranslate documentation but i think im doing something wrong. Any help will be appreciated.
Locotranslate child theme explanation -> https://localise.biz/wordpress/plugin/child-themes
function my_required_checkout_fields()
{
woocommerce_form_field(‘age_confirm’, array(
‘type’ => ‘checkbox’,
‘class’ => array(‘input-checkbox’),
‘label’ => __( ‘I declare that I am 16 years of age or older.’, ‘hello-elementor-child’ ),
‘required’ => true,
), WC()->checkout->get_value(‘age_confirm’));
}
Marc
Hello there,
Nice work you are doing here :-) I have a question to you. I have used your PHP code to get a checkbox at the checkout page. But how do I add another checkbox under the first one? Because when I try just to copy/paste the same code again, my website broke, do I have to add another code to get another checkbox or?
Best regards,
Marc
Jason Gravins
Great article, very informative and helpfull.
Can you tell us maybe how to add this newletter status to the Customers List Table ?
(we have their an option to export the table as a csv file) so it will be super helpfull if you can show us the way :)
Bernie Torras
Thank you very much! It works perfectly. I’ve added a class to overwrite the other form-control class that put the checkbox in display:block mode.
Stephane
Thank you, Work fine. We had a issue with mountain bike insurance. With that checkbox nobody can argue that they do not read the security rules.
Camilo
THANK YOU!!!!
it works perfectly, thank you very much!
Richard
Dear,
Great Tut but i have a question.
the required class he makes a abbr tag to.
How can i change it to span? because now the checkbox is nog working.
JT
Hi. Thanks for sharing the code. I am only using the main code. Interestingly, it works on desktop but not on mobile. On mobile, I was able to checkout without ticking the additional required checkbox. Any thoughts? Thanks!
Neil Gowran
Should work the same unless you are using a separate theme for mobile, also make sure all caches are cleared
JT
Hi Neil, thanks for getting back so soon. I was wrong, it’s not just about mobile. It happens on desktop too. I have come to realize that it doesn’t seem like a cache issue, but related to a delivery plugin. It’s kind of strange.
I am using this additional checkbox to remind customers to check that they have selected the date and time. If I did not choose the date and time, this additional checkbox prompts the error when untick. But if the date and time are selected, this error will not show up even when untick, and that’s when customers can bypass the checkbox. In both cases, I left the default terms checkbox untick to check which error message shows.
But I’m not sure how to workaround this.
richard
i have the same.
its about the required = true.
if you have that you dont see the checkbox.
because te tag is a abbr class=”required”
if you change abbr to span it works fine.
but i have no idea how to change it :( only in inspector hihi
JT
Interesting. Unfortunately, I have no clue too.
Hopefully Neil can share some insights. :)
Greg
Great, thanks!
Michael
Hi,
Hav anyone modified the code to be product specific?
Best
Michael
Jason Robie
Hi Michael,
I create a function that will loop through my cart items and grab the IDs of all the products.
Then, I call on that function within my hook so it will only show up if a specific product is in the cart (in this case, ID 2024).
function woo_custom_product_is_in_the_cart($ids)
{
$cart_ids = array();
// Find each product in the cart and add it to the $cart_ids array
foreach (WC()->cart->get_cart() as $cart_item_key => $values) {
$cart_product = $values[‘data’];
$cart_ids[] = $cart_product->id;
}
// If one of the special products are in the cart, return true.
if (!empty(array_intersect($ids, $cart_ids))) {
return true;
} else {
return false;
}
}
Then the top of that hook function looks like this:
function bt_add_checkout_checkbox() {
$product_ids = array(2024);
if (woo_custom_product_is_in_the_cart($product_ids)) { ?>
This only shows if product id 2024 is in the cart
rest of your code goes here
}
Judith Kocken
Thanks for helping out on this. I tried your code but my checkbox does not show up at all… Am I supposed to put the product ID somewhere in the first function or only in the second?
Arne
Thanks for this great little Tutorial.
The CSS is not working because the CSS-Ids are different (checkout_checkbox in php and checkout-checkbox in css)
I had to add an additional:
#checkout-checkbox {
position: relative;
}
since the woocommerce classes seems to let the checkbox have an absolute position, which looks not good.
JM
This is awesome! Massive respect to you Neil for helping newbies do what WooCommerce doesn’t.
When checking or not checking the box, is it possible to show a different value in the email/backend? By default the value of checked box is 1, and un-checked is nothing.
Neil Gowran
I updated the post so you can see how it’s possible to output different text based on whether the checkbox is checked or not.
JM
You’re the best!
chris
ok my bad, it’s working !
my error came because I’ve translated ‘error’ in wc_add_notice in my language…
thanks
chris
thanks but not working, you can pass trough with last wp version 5.7.1
Joel
This was super easy to implement. Is there a way to have this recorded in the customer meta or the order meta?
jacek
Hi, i have added your snippet to my page but unfortunately even when it is checked the error appears that it is unchecked. even if somebody want to buy my product on product page with apple pay without going to checkout page.
ame bin salam
hi, I want to add a description before the checkbox and after that the check box. how can I do it. can any help me
Neil Gowran
You can echo out some html before and after the woocommerce_form_field
echo '<h3>Hello Customer</h3>';
    woocommerce_form_field( 'checkout-checkbox', array( // CSS ID
       'type'          => 'checkbox',
       'class'         => array('form-row mycheckbox'), // CSS Class
       'label_class'   => array('woocommerce-form__label woocommerce-form__label-for-checkbox checkbox'),
       'input_class'   => array('woocommerce-form__input woocommerce-form__input-checkbox input-checkbox'),
       'required'      => true, // Mandatory or Optional
       'label'         => 'Ok I agree with <a href="/checkout-checkbox" target="_blank" rel="noopener">Checkout Checkbox Page</a>', // Label and Link
    ));
    echo '<h3>Goodbye Customer</h3>';
Paco
???????? Thank you very much for that, really very useful (͡⚈‿⚈͡).
Menachem Engel
Hi. This is so perfect for what I need on my site. Thank you so much! Any way to get this on the cart page instead of checkout and a customer wont be able to proceed to checkout unless they check the box? Thank you!
Bertrand
Hi,
This code is really helping, thanks a lot!
However, the required mode only works for Woocommerce bank transfer payment.
Paypal & Stripe keep skipping the required mode for this checkbox.
I have been looking around but do not know how to resolve this, any idea?
thanks in advance
Naomi
Hi,
thanks for the code, but as well as Damian, “required” is not working.
Neil Gowran
Code has been updated
Chloe
Hi Neil,
The required is not working (again).
Could you provide the updated one? Thank you for all your help!
Damian
Hi,
Looks good, but this code is not working for me. It passes even when user will leave them not checked :/
Neil Gowran
Have updated the code snippet
Damian
Great! Work as expected :)
Thank you again!
I let myself extend your code and add an option to save this checkbox in WooCommerce order status for case when I have more chceckboxes (required or not) and want to know which one was selected:
/* Save checkbox information in order details admin area meta */
add_action(‘woocommerce_checkout_update_order_meta’, ‘checkout_order_meta’);
function checkout_order_meta( $order_id ) {
if ($_POST[‘checkout-checkbox’]) update_post_meta( $order_id, ‘checkout-checkbox’, esc_attr($_POST[‘checkout-checkbox’]));
}
/* Display field value on the order edition page */
add_action( ‘woocommerce_admin_order_data_after_billing_address’, ‘select_checkout_field_display_admin_order_meta’, 10, 2 );
function select_checkout_field_display_admin_order_meta($order){
echo ‘‘.__(‘Checkbox no. 1′).’‘.__(‘ (user selected value): ‘) . get_post_meta( $order->id, ‘checkout-checkbox’, true ) . ”;
}
It work’s, but If you have any comment on that it would be great. I’m just a beginner.
Neil Gowran
Nice one, will have to check it out
khan
how to add a required checkbox but only when a specific product is in checkout?
David
The same question for me… Someone knows hot to do?
Damiaan van Vliet
Great, thanks for sharing the code. Could be useful on a future project.