CloudPanel out of the box comes with an application to deal with brute force attacks on SSH, NGINX and WordPress, only SSH has a configuration, the app is called Fail2ban.
Fail2ban is an app which bans access to your site from IP addresses which are trying to login to your services such as SSH on port 22, NGINX basic auth logins or WordPress logins or xmlrpc attacks.
It is good practice to deny any IP addresses which are constantly attempting to bruteforce into your VPS, Fail2ban analyses the server and web app logs to look for patterns and ban IP addresses.
This guide goes through Fail2ban for SSH on a CloudPanel instance with Ubuntu 22.04., and also looks at NGINX and WordPress protection.
Install Fail2ban
CloudPanel does have Fail2ban, in case your install does not this is how you install, SSH into your server as root and run:
apt update

apt install fail2ban
This will install and start the app including the monitoring of SSH by default, you will find Fail2ban files in this location:
/etc/fail2ban/
CloudPanel on a fresh install has fail2ban but it’s inactive, make it active
systemctl start fail2ban
The active jail for sshd will now be active and ban IP addresses after 5 failed login attempts over SSH – you can further tweak these settings by reading further below.
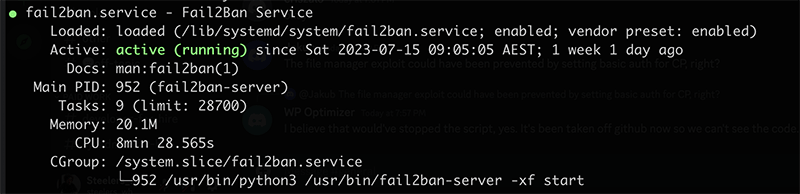
To see the status of Fail2ban run:
systemctl status fail2ban
Output should be similar to below:
You can also stop, start and restart it with following:
systemctl stop fail2ban
systemctl start fail2ban
systemctl restart fail2ban
Initially it may also be good to tail the log file in another shell tab to see what is happening whilst you are learning Fail2ban
tail -f /var/log/fail2ban.log
Make a new Fail2ban config file named jail.local, the jail.local one will override the main Fail2ban config called jail.conf.
Configure SSH Settings
[DEFAULT]
ignoreip = 127.0.0.1/8 1.2.3.4
bantime = 1800
findtime = 1200
maxretry = 8

[sshd]
enabled = true
logpath = %(sshd_log)s
port = 22
banaction = iptables
maxretry = 4
So you add sections in square brackets[] the default settings section followed by jails for each service
In the default section the values are applied globally but can be overwritten by individual jails below it, the following values are explained:
ignoreip – good to add your office/home any developer or client permanent IP addresses (space separated)
bantime, findtime, maxretry – the first 2 values are in seconds and are worked out that if the maxretry logins are exceeded in the findtime then that IP is banned for the length of the bantime. So if you wanted 8 maxretrys banned for 24 hrs that had tried to gain access in an 20 minutes the following would do it.
# “bantime” is the number of seconds that a host is banned.
bantime = 86400
# A host is banned if it has generated “maxretry” during the last “findtime”
findtime = 1200
# “maxretry” is the number of failures before a host get banned.
maxretry = 8
After you make changes restart Fail2ban:
systemctl restart fail2ban
Instead of seconds, prepend an ‘m’ to the numeric values in the jail for minutes.
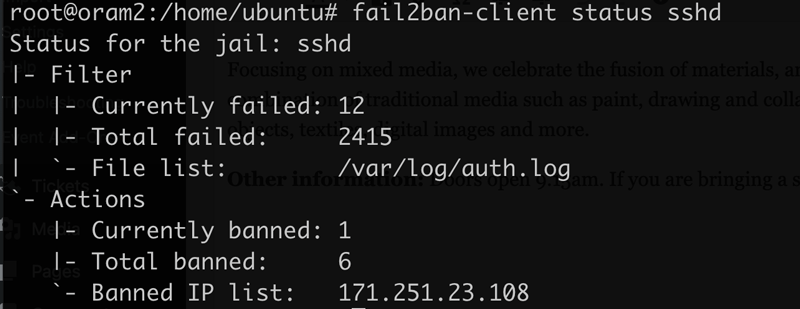
Now your VPS is analyzing logs and banning IP addresses. Check the status of the jail by running:
fail2ban-client status sshd
Output should be similar to:
Further strengthen your server by stopping all SSH password connections and just leave public SSH key connections the only valid way to SSH in to your instance.
Add and Configure NGINX basic auth Jail
You can also add a NGINX basic auth Jail, which will ban IPs that try to brute force your basic auth logins – CloudPanel allows you to add these for the master login plus any sites you have set up.
Add another segment to your jail.local config file and add:
[nginx-http-auth]
enabled  = true
port     = http,https
logpath = /home/*/logs/nginx/error.log
The log path value has been changed to accommodate CloudPanel’s user logs.
After you make changes restart Fail2ban
systemctl restart fail2ban
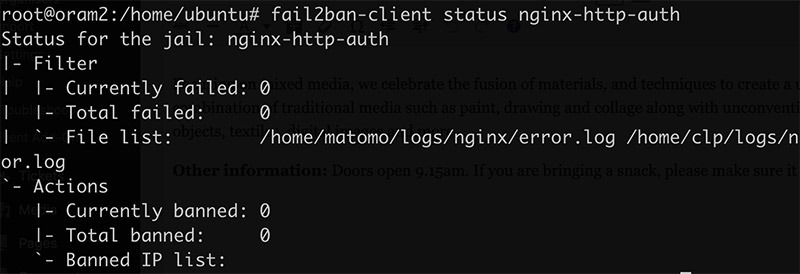
Check the status of the jail by running:
fail2ban-client status nginx-http-auth
Output should be similar to:
Manually ban an IP address
fail2ban-client set sshd banip 1.2.3.4
Manually unban an IP address
fail2ban-client set sshd unbanip 1.2.3.4
Change the Jail name to suit the ban, so you can use:
fail2ban-client set wordpress banip 1.2.3.4
or unban:
fail2ban-client set wordpress unbanip 1.2.3.4
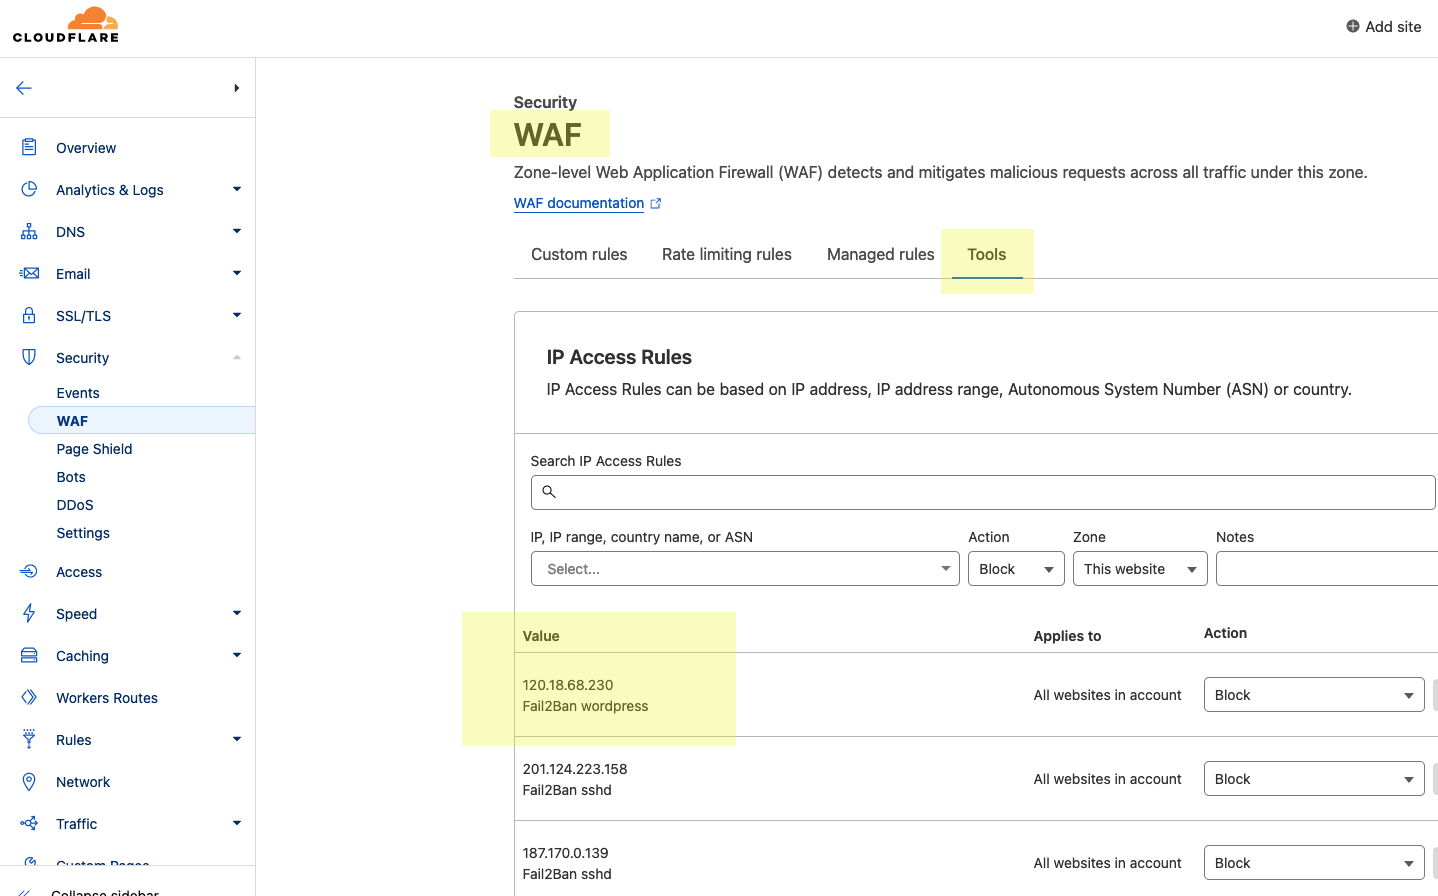
See banned IPs in iptables from Fail2ban
See the lot.
iptables -v -L f2b-wordpress
or:
iptables -v -L f2b-sshd
Or search for a particular one
iptables -nL | grep -i 1.2.3.4
WordPress Fail2ban Jail
You can ban IP addresses that are brute forcing your wp-login.php and xmlrpc.php pages on a WordPress install with Fail2ban on a CloudPanel server.
Add a WordPress Fail2ban Jail config in your local jail file
[wordpress]
enabled = true
usedns = no
port = http,https
filter = wordpress
logpath = /home/*/logs/nginx/access.log
maxretry = 6
findtime = 1200
bantime = 1800
The logpath uses CloudPanel log paths.
Add a WordPress Fail2ban filter
Create a wordpress.conf filter file in /etc/fail2ban/filter.d/
nano /etc/fail2ban/filter.d/wordpress.confAdd in:
[Definition]
failregex = ^<HOST> .* "POST .*wp-login.php
            ^<HOST> .* "(POST|GET) .*xmlrpc.php
ignoreregex =
If you just want to ban only one of the pages just remove one. You will see above I am using both POST & GET requests on xmlrpc as I find that gets more attacks – but of course you can add GET to wp-login too.
Change the maxretry or bantime or findtime if needed.
The actual login of a legitimate account will count towards a retry so don’t put in too small a number as a user may login/logout a number of times in a space of time – so in the above I have 6 login retries within a 20 minute span, if this is exceeded then the IP will be banned for 30 minutes, it is good practice to whitelist any known static IP addresses belonging to regular users.
Restart Fail2ban
service fail2ban restart
If Fail2ban fails to start, make sure you have at least one site configured as this will validate the log path by adding the nginx log – otherwise fail2ban won’t start.
Check Fail2ban Log
Check the fail2ban log to ensure everything loads without error
tail -f /var/log/fail2ban.log
Check WordPress Jail status
You can check the WordPress jail status
fail2ban-client status wordpress
This will give you the log file list and any banned IP addresses.
When you are comfortable with Fail2ban and understand how it works you can add further WordPress filters to the jail.
Cloudflare & Real IPs
If you are using Cloudflare proxy on your sites, you can instead set up a couple of WAF rules for these WordPress xmlrpc.php and wp-login.php pages instead of using fail2ban.
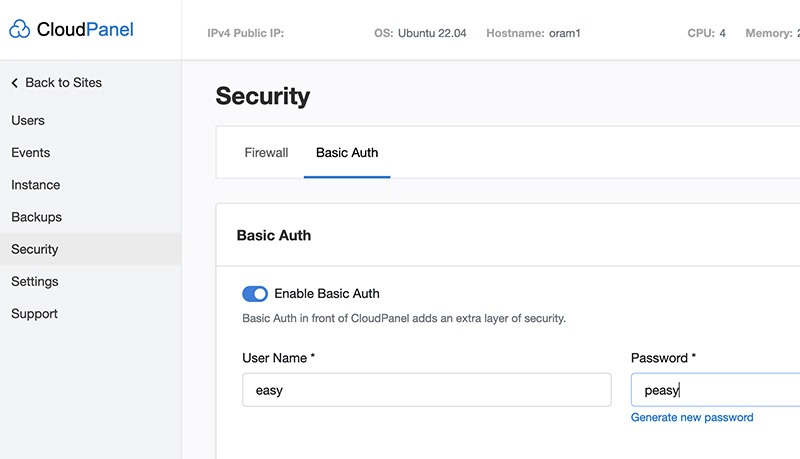
If you still want to use Fail2ban against WordPress bruteforcing and have Cloudflare Proxy turned on you need to enable CloudPanels Cloudflare setting per site – enable it from the CloudPanel > Site > Security:
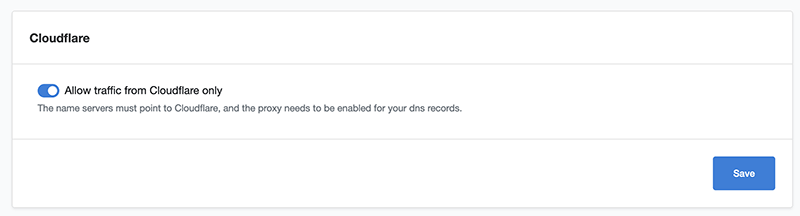
Now the real IPs will be revealed instead of Cloudflares IP addresses, NGINX already has the real IP setting in the vhost but the above toggle needs to be enabled.
Banning Cloudflare Users
Ok once real IPs are revealed open the cloudflare.conf in the action.d directory:
nano /etc/fail2ban/action.d/cloudflare.conf
At the bottom of cloudflare.conf add in your Cloudflare email and Global API token:
cftoken = ab0962941fd9a47aaf61593e9999a8f289c2
cfuser = [email protected]
Finally add in an extra action in your jail.local conf to trigger the Cloudflare conf:
[wordpress]
enabled = true
usedns = no
port = http,https
filter = wordpress
logpath = /home/*/logs/nginx/access.log
maxretry = 6
findtime = 1200
bantime = 30m
action = cloudflare
    iptables-allports
The iptables-allports is intentionally indented.
Restart Fail2ban to take effect.
systemctl restart fail2ban
You will see the banned IP addresses now also in Cloudflare as well as Fail2ban.
Uninstall Fail2ban
If you no longer need Fail2ban:
systemctl disable fail2ban
Find out more on the Fail2ban website and github repo.
If you are interested in an alternative solution to bruteforce, check out Crowdsec, here is a CloudPanel tutorial.