Custom Post Types are a great way to structure your data and also to provide an interface for an end user to easily populate data as in any content management system. There are WP plugins available for download that can create and manage custom post types but you can also follow WordPress functions and do it yourself.
Creating Custom Post Types for a Genesis Child Theme is pretty much like any other WordPress theme, these custom post types can be created in your functions.php file of your child theme or you can create them with your own plugin.
Creating CustomPost Types for WordPress
The custom post type is created with a function and action in the example below we are creating a new custom post type for a fictitious Tax Liens company which essentially require a custom post type that will be used to store various details of Tax Lien offices.
add_action( 'init', 'create_custom_post_type' );

function create_custom_post_type() {

   $labels = array(
    'name' => __( 'Tax Liens' ),
    'singular_name' => __( 'Tax Lien' )
    );

    $args = array(
    'labels' => $labels,
    'public' => true,
    'has_archive' => true,
    'rewrite' => array('slug' => 'taxliens'),
    );

  register_post_type( 'tax_lien', $args);
}
The add_action line at the top creates the custom post type from the function below it. The function below it can be called anything but that same function name must be used in the add_action argument after ‘init’,
In the function part of the code beneath the function name create_custom_post_type we have a number of arguments passed to the new custom post type with the above being the bare minimum to get the post type up and running, there are 2 main arrays of arguments the labels array give the custom post type a singular and plural name, whilst the args array is the main array that also contains the $labels variable, then has the public argument makes it show front and back end and allows the post to be searched on and has_archive gives it an archive.
The rewrite argument and array gives the ‘slug’ url a term that will prefix the custom post URL similar to how a category would. This will be the URL which will display the archive listing of all the same custom post types content similar to the blogroll. It’s not compulsory but makes sense to do so as this is logically structuring the data.
Below the $args array but within the same create_custom_post_type () function we are using a WordPress function called register_post_type to register the new custom post type and calling it tax_lien as well as registering all the arguments that go with it by expressing the $args variable.
With this in place we will now have a custom post type in the WordPress dashboard.
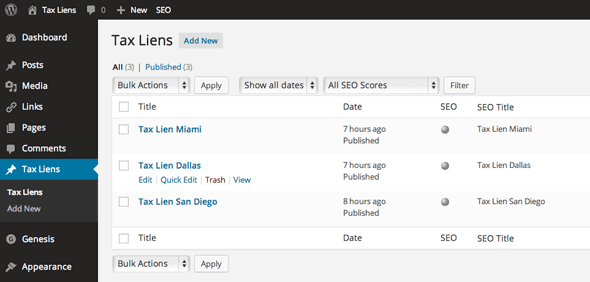
At this stage we can now populate our Custom Post Types by creating new ones and adding content similar to a regular post.
Creating the WordPress Templates for the CustomPost Types
Regular WordPress posts use the single.php file as the key template and the archive template that displays a bunch of posts uses the archive.php template. Genesis will also use the single.php template for a custom post type and index.php for the archive both of these just use the same Genesis framework code which simply consists of genesis();
Should you need to deviate from the default Genesis code you can also create custom post type templates named single-custompostypename.php and archive-custompostypename.php so in this example these would be:
single-tax_lien.php and archive-tax_lien.php the latter half of the template name taken from the register_post_type function declared as the first argument earlier.
So if required, create these files in your child theme folder and name them appropriately. For their content, to begin with, copy and paste in the contents of the regular single php template :
<?php

//* Template Name: Tax-Lien

genesis();
Custom Post Type Templates Not Showing
You may now need to re-save your permalink structure for the new templates to be recognised and appear, Settings > Permalinks, just go there and click save.
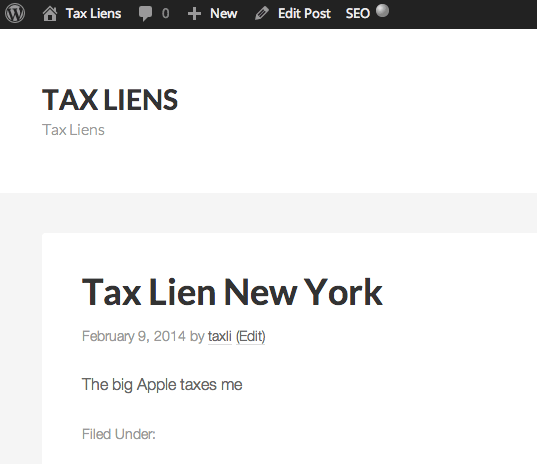
Now your custom post types will show in the front end as well as the archive listings under the custom slug set earlier.
More Detailed Custom Posts
The custom post type can have more detail set about it by passing in more arguments and values
add_action( 'init', 'create_custom_post_type' );

function create_custom_post_type() {

   $labels = array(
    'name' => __( 'Tax Liens' ),
    'singular_name' => __( 'Tax Lien' ),
    'all_items' => __('All Tax Liens'),
    'add_new' => _x('Add new Tax Lien', 'Tax Liens'),
    'add_new_item' => __('Add new Tax Lien'),
    'edit_item' => __('Edit Tax Lien'),
    'new_item' => __('New Tax Lien'),
    'view_item' => __('View Tax Lien'),
    'search_items' => __('Search in Tax Liens'),
    'not_found' =>  __('No Tax Liens found'),
    'not_found_in_trash' => __('No Tax Liens found in trash'),
    'parent_item_colon' => ''
    );

    $args = array(
    'labels' => $labels,
    'public' => true,
    'has_archive' => true,
    'rewrite' => array('slug' => 'taxlien'),
    );

  register_post_type( 'tax_lien', $args);
}
Adding in additional labels to the labels array changes the backend appearance to be more specific and intuitive about the custom post type
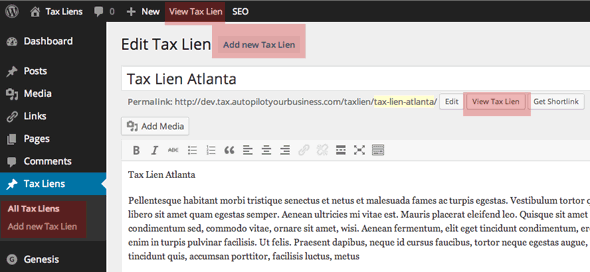
Adding in more arguments and values…
add_action( 'init', 'create_custom_post_type' );

function create_custom_post_type() {

   $labels = array(
    'name' => __( 'Tax Liens' ),
    'singular_name' => __( 'Tax Lien' ),
    'all_items' => __('All Tax Liens'),
    'add_new' => _x('Add new Tax Lien', 'Tax Liens'),
    'add_new_item' => __('Add new Tax Lien'),
    'edit_item' => __('Edit Tax Lien'),
    'new_item' => __('New Tax Lien'),
    'view_item' => __('View Tax Lien'),
    'search_items' => __('Search in Tax Liens'),
    'not_found' =>  __('No Tax Liens found'),
    'not_found_in_trash' => __('No Tax Liens found in trash'),
    'parent_item_colon' => ''
    );

    $args = array(
    'labels' => $labels,
    'public' => true,
    'has_archive' => true,
    'menu_icon' => '',
	'rewrite' => array('slug' => 'taxlien'),
	'taxonomies' => array( 'category', 'post_tag' ),
	'supports'  => array( 'title', 'editor', 'thumbnail' , 'custom-fields', 'excerpt', 'comments', 'genesis-cpt-archives-settings' )
	);

  register_post_type( 'tax_lien', $args);
}
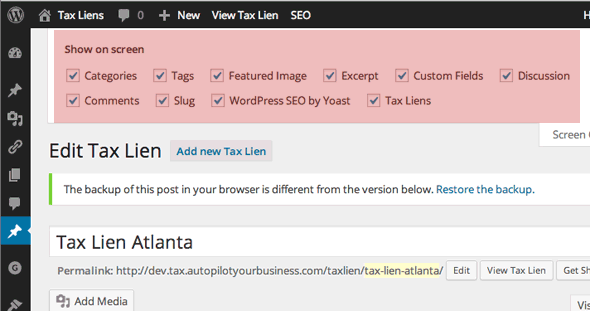
Here some more features are added in to the $args array:
The ‘menu-icon‘ will add a CSS class that you can target to add in a custom menu icon.
taxonomies can set up a categories and tags section for that custom post type.
supports allow for fields and meta usage similar to regular posts but they must be explicitly set for custom post types.
So the function is declared with 2 arrays, then registered with the args array which contains the labels array, the function is initialised with the action.
Note on Yoast SEO
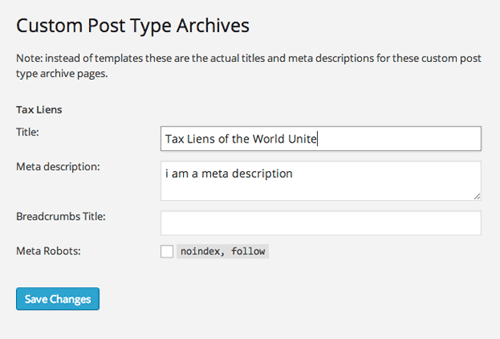
The Yoast WordPress SEO meta box is enabled to the custom post type without declaring it in the supports array, this will work fine in the single posts but in the archive if you want the Yoast SEO settings you’ll need to pay a trip to the Titles and Meta part of the plugin and look for the new custom post type for which there will be controls for the single and archive pages.
Genesis supports
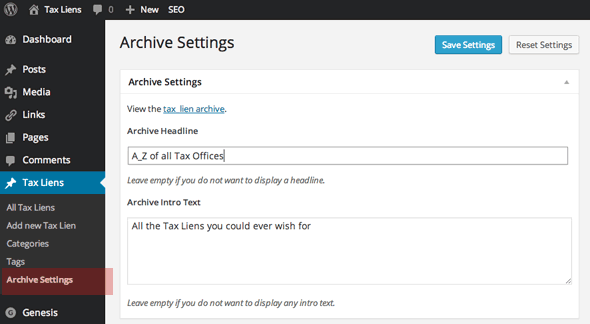
One of the supports specific to Genesis is genesis-cpt-archives-settings when this is enabled you get Genesis theme setting control over the new archive template including layout, description, body class. It also includes SEO settings but if your using Yoast then see the previous text.
Writing Your Own Plugin To Manage the Custom Post Type
One issue with writing the custom post types in the functions.php file is that if the theme is changed the functionality is lost as a functions.php file is theme dependent whereas a plugin is not. All thats needed is to copy the custom post type code and paste it into a plugin file.
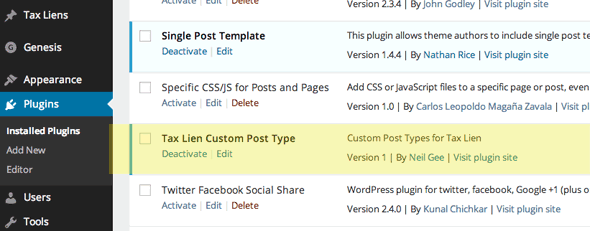
Create a plugin file in /wp-content/plugin/ name it what you like ~ this example uses taxliens-cpt.php the top of file requires standard WordPress plugin info:
<?php
/*
Plugin Name: Tax Lien Custom Post Type
Plugin URI: http://www.taxliens.com
Description: Custom Post Types for Tax Lien
Author: Neil Gee
Version:1
Author URI:https://wpbeaches.com
*/
In the full complete gist below I am using ‘Event‘ as the custom post type, just paste in your custom post type code in the appropriate places and save and then activate the plugin in the dashboard.
To change the menu position of the custom post type follow this guide.
This guide is just intended to as a starting guide to getting custom post types up and running there’s a lot more info out there and it can get quite detailed – references, Codex and Justin Tadlock








12 comments
Sreehari Sree
Well explained post :)
Thanks for sharing.
Ief
Hello. Thanks for this article. Now I know how to make a custom post type in Genesis and display this in my website.
But I have a problem with category and tags. When I add an event and associate it with a category or tag and click on a category or tag wordpress says “Sorry, no content matched your criteria.” on that page. How can I solve this problem?
Neil Gee
By default CPTs are not associated with categories and tags, follow this to fix it https://wpbeaches.com/show-custom-post-types-category-archive-page/
Ief
Thanks. Great site
Micha
Hey. I have a question about this. I’m trying to learn more about this and I’ve ready a bunch of post on creating custom post type. Every one of them except your post here uses the “register_post_type” while you’ve used “create_custom_post_type”. I’m just not sure what the difference is and why you’d use one over the other. Can you please help me wrap my head around that?
Thanks for the great post!
Neil Gee
I have only used ‘create_custom_post_type’ as the function name – which In theory can be anything unique, I have used register_post_type in the function to register the custom post type – in the main gist you will see it as
register_post_type( 'event', $args );Ahmad Fahrurroji
Finally, I find this great tutorial. I want to make new custom post types for my single post in genesis child theme and this is what I want.
Thanks for sharing this.
Abdur
thanks buddy
Daniela
Hi,
I also wanted to say thank you for this great explanation. I tried to create a CPT for the first time according to your guide and everything turned out very fine :)
Neil Gee
Thanks Daniela – good to hear it worked out
Porter
I just wanted to say thanks for the awesome write up. I’ve been reading as much as possible on CPT, taxonomies, Genesis, etc, and this is one of the best article I’ve come across when it comes to laying out the information in a way someone new to the material can understand. Just figured I’d drop a note and say thanks, as apparently nobody else has bothered thus far, and it’s definitely deserved.
Neil Gee
Thanks for the feedback – I do try and explain for people new to the context of it all