This guide takes you through adding an editable text block via the Customizer in WordPress, this tutorial uses the Genesis Sample theme and will set the footer text which is normally changed via a filter in the functions.php file in a number of StudioPress themes, using the Customizer will easily allow a non-technical user to change it.
You can build on this example and add a number of text blocks that you may need a client to edit throughout the Site.
Add a New Panel, Section, Setting and Control for the Customizer
So here a new panel is created which can hold any future text blocks, a section, the actual footer setting and a control to control what type of data we are dealing with.
The panel and section are optional, you can append the setting and control to an existing section which should belong to a panel.
In the add_setting array I am using a sanitize callback sanitize_text which is declared further down in the code, the text which the user enters via the Customizer is run through a sanitize filter which essentially strips out code, but allows some html as I want the ability to use links, alternative sanitize functions include sanitize_text_field or esc_textarea, here is a reference to all of them. It is considered best practice to make sure that data being input and output is validated and stripped of any malicious code.
How it looks in Customizer
So our Customizer will now have new panel and section…
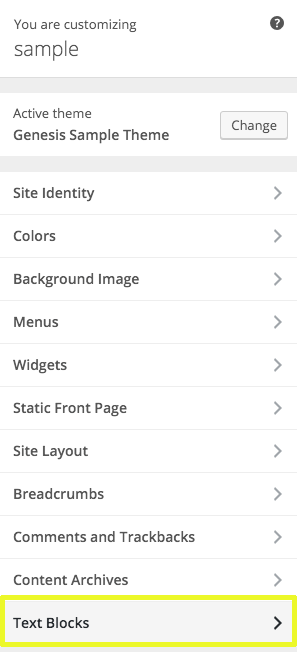
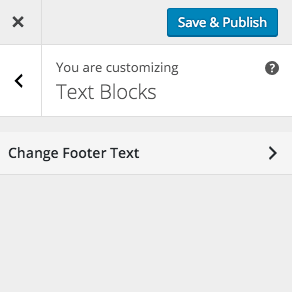
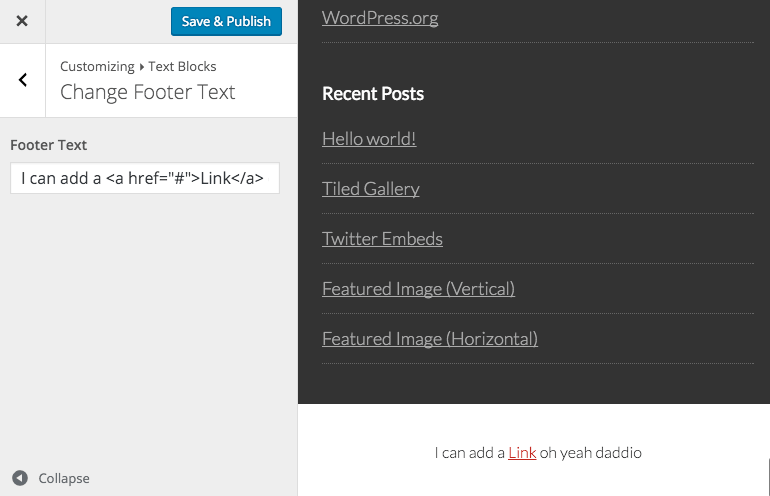
Displaying in the Front End
To display the text in the front end we need to call the add_setting name (which in this case is ‘footer-text-block‘) with the get_theme_mod() function.
So in the above I am using the Genesis filter genesis_footer_creds_text to change the text to the Customizer set text if it’s not empty – if that field is blank then I am calling in a default text line.
If the theme is not Genesis then just add the code directly where you want it output.









14 comments
Taimoor Hassan
Really Nice Tutorial.
I really wanna thanks for creating this and request to continue such tuts and cover every minor point of WordPress.
MMGhoreishi
Your code has a problem when we want to add Several inputs
Rafael Cosquiere
Awesome, well explained and concise. I learn a new thong today and i keep the tutorial on my bookmark.
In the end i decide not to opt for this solution and instead use the widgets method. But I have in mind to create a theme that is 100% configurable from the customizer. I have not seen any examples of this yet.
Do you think it could be a nice option?
Thank you!
CHRIS KETTENBACH
Thanks for the great tutorial! Awesome. =)
Andy
Hi Neil,
Is there a way to do this with images instead of text blocks? I’m using genesis and there isn’t much out there on how to insert simple images into the customizer options. Thanks!
Neil Gowran
Here is a recent tutorial I did on using a background image on a widget via the Customizer – https://wpbeaches.com/add-background-image-widget-customizer-wordpress/
Andy
Awesome. I’ll try that out. One more thing as I can’t seem to find much on the theme customizer with Genesis. Is there a way to add dynamic links to these images and text blocks?
Andy
Do you know of a good article that add dynamic inks to text fields in the customizer at all Neil? I’m just stuck on this final thing.
dave
I believe that I have run in to the same issue. When adding a link to my textarea Whatever I am not seeing the front end render as expected and after page reload my html is removed. This may or may not be the correct way to do this, but i removed the ‘sanitize_callback’ => ‘sanitize_text’ and my html is restored.
sanitize_text_field strips all tags https://developer.wordpress.org/reference/functions/sanitize_text_field/
I’m leaving this comment for anyone else that may need more information. Other than this one item, the tutorial worked great for me.
Amber
This is a GREAT tutorial and I’m so glad I found it after an hour of trying to search how to do this on my own with no luck! Thank so much for this!
There is one thing I’m seeming to be having troubles with and that’s to have the text and styling updates appear real time as it I update it in the theme customizer. It doesn’t seem to be updating (so not applying the text changes until after I hit the “Save & Publish” button. I’ve copied your code exactly as I see here so not sure what might be happening?
Neil Gowran
Hi Amber, my sanitize function was incorrect, change it from
return wp_kses( $text );toreturn sanitize_text_field( $text );and then it should refresh normallyAmber
Awesome! Thanks so much Neil!
Clay
Thank you for the great tutorial. However, I think you need
add_action( 'customize_register', 'genesischild_register_theme_customizer' );in order to get it to show up in the customizer.
Neil Gowran
Of all the things to leave out! Thanks for letting me know – gist updated